Gifts & small builds · 10 steps
Cornhole Boards
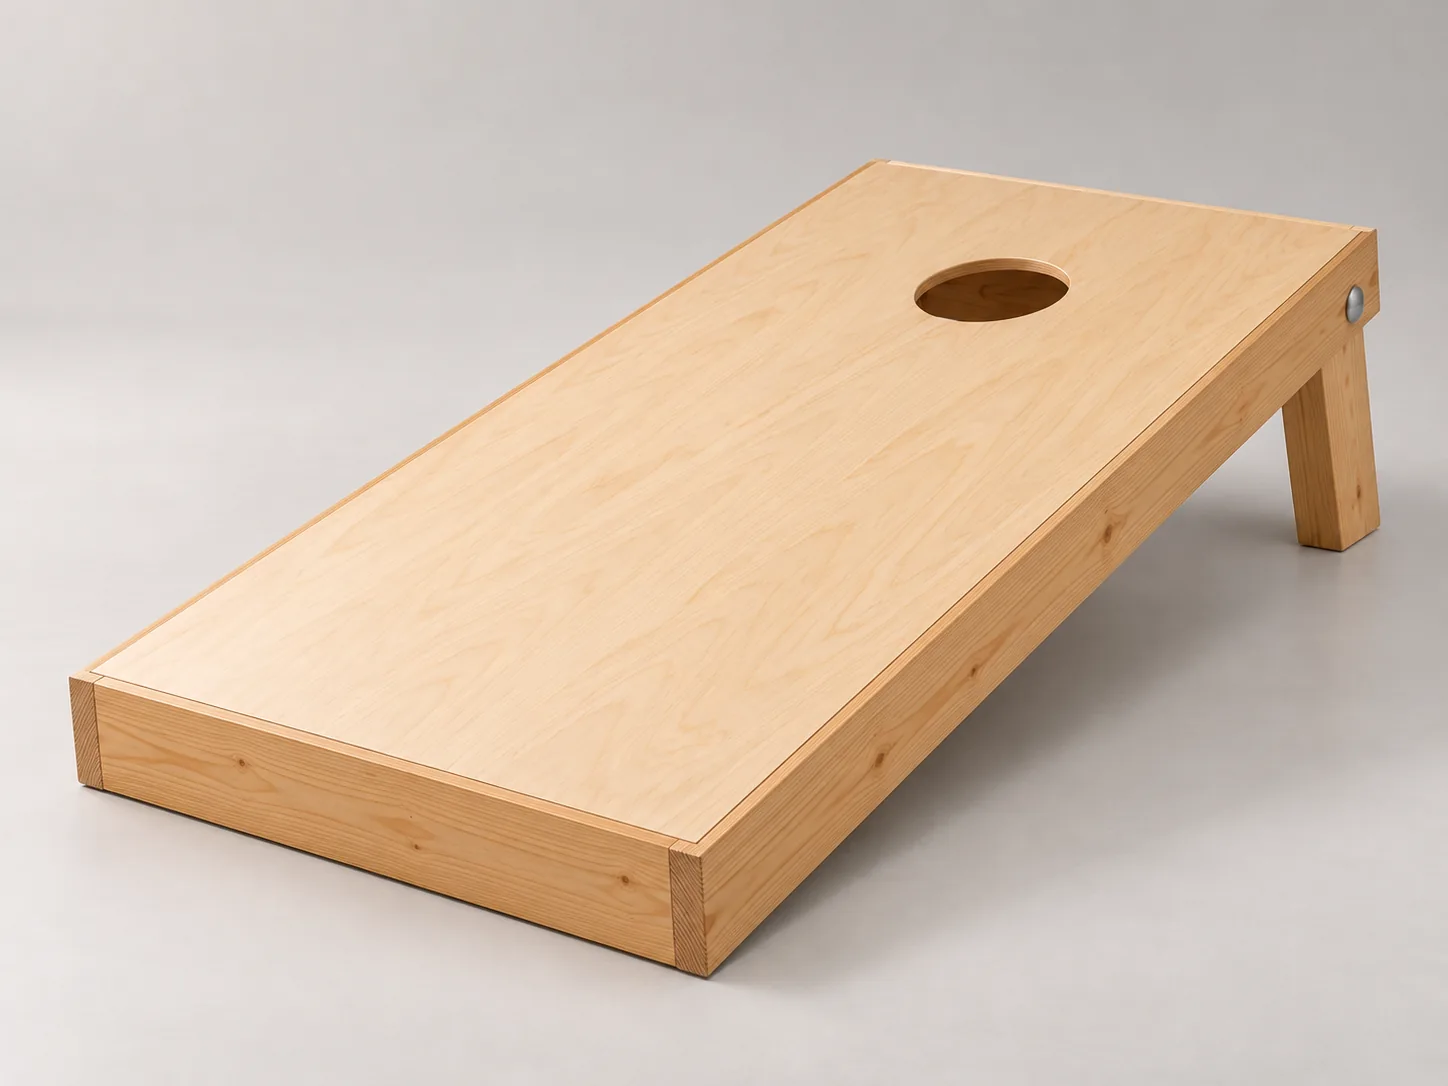
Regulation 24 x 48 in boards with a 6 in hole and folding legs. Plywood and 2x4s, one weekend for the set.
- Finished size
- 24" W x 48" D x 4" H
- Metric
- 610 mm x 1219 mm x 102 mm
- Material
- 1/2" plywood panel, 2 x 4 ft, plus 2x4 lumber
- Steps
- 10
- Build time
- 5-6 hours + finish
- Skill
- Beginner
What you will build
A regulation cornhole board is a 24 x 48 in plywood deck on a 2x4 frame, with a 6 in hole 9 in from the top edge and folding legs that raise the top edge to about 12 in. This plan builds one board and you build it twice for a set. Each board takes one 2 x 4 ft panel of 1/2 in plywood and two 8 ft 2x4s, joined with glue and screws, and the legs pivot on carriage bolts and fold flat inside the frame for carrying. A beginner with a circular saw, a drill and a jigsaw can build a set in one weekend.
Cut list
Cut list for ONE board. Build two identical boards for a set. The deck is 1/2 in plywood and every other part is a 2x4 (1-1/2 x 3-1/2 in).
| Part | Name | Material | Qty | Length | Width |
|---|---|---|---|---|---|
| A | Deck | 1/2" plywood | 1 | 48" (1219 mm) | 24" (610 mm) |
| B | Side rail, left | 2x4 | 1 | 48" (1219 mm) | 3-1/2" (89 mm) |
| C | Side rail, right | 2x4 | 1 | 48" (1219 mm) | 3-1/2" (89 mm) |
| D | End rail, front | 2x4 | 1 | 21" (533 mm) | 3-1/2" (89 mm) |
| E | End rail, back | 2x4 | 1 | 21" (533 mm) | 3-1/2" (89 mm) |
| F | Middle brace | 2x4 | 1 | 21" (533 mm) | 3-1/2" (89 mm) |
| G | Leg, left | 2x4 | 1 | 11" (279 mm) | 3-1/2" (89 mm) |
| H | Leg, right | 2x4 | 1 | 11" (279 mm) | 3-1/2" (89 mm) |
Tools
- Circular sawOr have the store cut the panel
- JigsawFor curved cuts like the 6 in hole
- Drill / driver
- Countersink bit with 1/8" pilot drill
- 1/4" drill bit
- Bar clamps (4)
- Speed square
- Tape measure
- Random orbit sander
Materials
- 21/2" birch plywood project panel, 2 x 4 ft
- 42x4 x 8 ft studs, straight and kiln-dried
- 24#8 x 3" exterior wood screws (frame)
- 28#6 x 1-1/4" flat-head wood screws (deck)
- 41/4"-20 x 3-1/2" carriage bolts (legs)
- 41/4" flat washers
- 41/4"-20 wing nuts
- 1Wood glue
- 1Wood filler
- 1 setSandpaper 120 / 180 / 220 grit
- 1Exterior paint or stain
- 1Clear exterior polyurethane, satin
Tool and material links are affiliate links. Disclosure.
Step-by-step instructions
The same steps as the interactive 3D guide, where each step is animated.
1The finished project
A regulation cornhole board 24" wide and 48" long, with a 6" hole and legs that fold flat inside the frame.
- Read every step once before you cut anything. You will build two identical boards for a set.
- This plan is for ONE board: the lists and drawings show a single board, so buy and cut double for a set.
- The board is drawn lying flat with the legs folded. In use, the legs swing down at the end with the hole, which raises that edge to about 12" off the ground while the front edge stays 4" high.
Boards for sanctioned play must follow the current rules of the organization running the event. This plan follows the American Cornhole Organization board dimensions.
2Tools & materials
Gather everything for both boards before you start.
- For a set of two boards, buy two 1/2" plywood panels (2 x 4 feet) and four 8 foot 2x4s. Pick straight 2x4s without twist and without large knots.
- Pick up the fasteners on the materials list. Exact lengths matter in this build.
- Set up a flat work surface at least 24" x 48".
Wear eye and hearing protection when cutting and drilling.
3Cut the parts
Cut the frame parts from two 2x4s. The plywood panel is already the size of the deck.
- Deck A: a 2 x 4 ft project panel is the deck. Choose a panel that measures a full 24" x 48" and leave it uncut. The drawing shows it on the panel.
- Cut list for ONE board: two side rails 48" long (B, C), two end rails 21" long (D, E), one middle brace 21" long (F) and two legs 11" long (G, H).
- First 2x4: cut one side rail 48" and two end rails 21". Measure every piece from the same end of the stud. That uses 90-1/4" of the stud, kerfs included.
- Second 2x4: cut the other side rail 48", the middle brace 21" and two legs 11". That uses 91-3/8" of the stud, kerfs included.
- Make every cut square, using the speed square. Label each part with its letter in pencil.
Each cut removes about 1/8" of wood (the saw kerf). Measure each piece from the end of the stud and mark the kerf side of the line.
Most home centers will cut the 2x4s for you at no charge. Show them the cut list.
4Cut the 6 in hole
Mark and cut the 6" hole in the deck while it is still flat on the bench.
- Lay deck A on the bench with the better face up. Pick one short edge as the TOP edge. Pencil TOP on it.
- Mark the center line of the deck: make a mark 12" in from each long edge, along the TOP edge.
- Measure 9" down from the TOP edge along the center line. That point is the center of the hole.
- Draw the circle. Tap a small nail into the center, tie a string to it and tie a pencil to the string so the pencil is 3" from the nail. Swing the pencil around. You can also trace a 6" wide round lid.
- Drill a 1/2" start hole inside the circle. Cut along the line with the jigsaw, staying just outside the pencil line.
- Sand the cut edge smooth until the circle is exactly 6" wide, and ease the top edge of the hole slightly.
Support the deck so the circle does not drop and pinch the blade near the end of the cut.
The hole belongs near the TOP edge, the end that the legs will raise. Mark which end is TOP before you cut.
5Mark the frame screws
Mark and drill the screw holes in the side rails. Each end of each rail gets two screws, and so does the middle.
- Lay side rails B and C on the bench with the outside faces up. Each one is 48" long. The two rails are mirror images: mark the OUTSIDE face of both.
- At each end of each rail, mark two screw centers 3/4" in from the end. That is the middle of the 1-1/2" thick end rail. Mark the first 1-1/4" from one edge and the second 1-1/4" from the other edge, so they end up 1" apart.
- Mark the same two screws 24" from the end, in the middle of each rail. That is where the middle brace will be.
- Drill a 1/8" pilot hole through the rail at each of the 6 marks on each rail, then countersink each hole so the screw head sits flush.
Keep the pilot holes straight and square to the face of the rail. A crooked screw can come out of the side of the end rail.
6Build the frame
Screw the end rails and the middle brace between the two side rails.
- Stand the parts on a flat bench on their top edges, so every top edge is flush with the bench. The deck will land on these edges.
- Put glue on both ends of front end rail D and back end rail E. Press each one between the side rails with its ends flush with the ends of the rails. Clamp it.
- Drive the #8 x 3 in screws through the pilot holes in B and C into the ends of D and E: 2 screws per joint, 8 in all.
- Slide in middle brace F with glue on both ends. Its center is 24" from the front end. Drive the last 4 screws through the middle holes.
- Measure both diagonals of the frame. They must be equal. If they differ, push the long diagonal corners together until they match, then let the glue set.
Wipe off glue squeeze-out now. Dried glue shows through paint.
The deck must sit flat on the frame: check that all the top edges are flush before the glue sets.
7Attach the legs
Round the end of each leg and bolt it to the inside of the side rail so it swings down.
- Round the end of legs G and H that will pivot. Trace a half circle with a radius of 1-3/4" (the leg is 3-1/2" wide) and cut it with the jigsaw. Sand it smooth.
- Mark the bolt hole on each leg: 1-3/4" from the rounded end and 1-3/4" from each long edge.
- Hold leg G flat against the inside of left rail B, with its rounded end toward the back and about 1/4" short of back end rail E. Clamp it.
- The bolt center on the rail is 3-1/2" from the back end of the rail and 1-3/4" up from the bottom edge. Drill a 1/4" hole through the rail and the leg together.
- Push a carriage bolt through from the outside. On the inside of the leg add a washer and a wing nut. Tighten by hand until the leg still swings but does not wobble.
- Repeat on the right side with leg H. Fold both legs flat inside the frame.
Both bolt holes must be at the same distance from the back end, or the board will sit crooked.
The leg must clear back end rail E when it swings. If it touches, round the leg a little more.
8Attach the deck
Glue the deck to the frame and screw it down.
- Dry fit: set deck A on the frame with its hole at the BACK, the end with the legs. All four edges must be flush. Lift it off.
- Spread glue on the top edges of the rails, the end rails and the middle brace. Keep glue off the legs.
- Lower the deck onto the frame, align all four edges and weight or clamp it.
- Mark the screws on the deck, 3/4" in from each long edge (the middle of the rail). Start 6" from the front edge and repeat every 12": 4 screws on each side.
- Mark 2 screws on each of the front end rail, the middle brace and the back end rail, 6" in from each long edge. The middle brace is 24" from the front edge.
- Drill a 1/8" pilot hole at each of the 14 marks, countersink it and drive a #6 x 1-1/4 in screw.
Use 1-1/4 in screws only, and keep out of the area around the hole.
Do not let glue reach the legs: they must swing freely.
9Sand & finish
Make a smooth playing surface that looks like a store-bought board.
- Fill every screw head on the deck with wood filler. Let it dry, then sand it flush.
- Sand the deck and frame with 120, then 180, then 220 grit. Round every sharp edge slightly, and round the edges of the hole.
- Wipe off dust. Paint or stain the frame and the deck. Apply 2 coats, sanding lightly with 220 between coats.
- Apply 2 to 3 thin coats of clear polyurethane to the deck. A smooth finish lets the bags slide. Let it cure as the can says before play.
Oily finishing rags can catch fire on their own. Lay them flat outdoors to dry.
Do not fold the legs until the paint is completely dry, or it can stick to the frame.
10Final check
Check the size and the stance before game night.
- Measure the deck. It must be 24" wide and 48" long, and the center of the hole 9" from the top edge.
- Swing both legs down and stand the board on a flat floor. The top edge of the playing surface should be about 12" off the floor and the front edge 4". Check both legs touch the floor and the board does not rock.
- Tighten both wing nuts by hand. Fold the legs flat and check that they fit inside the frame.
- Repeat the whole plan for the second board. Both boards must match.
Check the wing nuts before every game. They can loosen over time.
Cornhole Boards: frequently asked questions
What size is a regulation cornhole board?
A regulation cornhole board is 24 in wide and 48 in long (610 x 1219 mm), with a 6 in hole centered 9 in down from the top edge. This plan follows the American Cornhole Organization (ACO) board dimensions: the top edge of the playing surface is about 12 in off the ground and the front edge is 4 in high.
How much plywood and lumber do I need to build cornhole boards?
You need two 2 x 4 ft panels of 1/2 in plywood and four 8 ft 2x4s to build a set of two cornhole boards. Each board uses one panel for the deck and two 2x4s for the frame and legs: two 48 in side rails, two 21 in end rails, one 21 in middle brace and two 11 in legs.
What tools do I need to build cornhole boards?
You need a circular saw, a jigsaw for the 6 in hole, a drill/driver with a countersink bit and a 1/4 in bit, four bar clamps, a speed square, a tape measure and a sander. A wrench is not needed because the legs use wing nuts.
How long does it take to build a set of cornhole boards?
A beginner can build a set of two cornhole boards in 5 to 6 hours of shop time, plus drying time for the glue, paint and clear coat. The plan has 10 steps and you repeat the steps for the second board.
How do the legs on a cornhole board work?
Each leg of this cornhole board is a 2x4 cut 11 in long that pivots on a 1/4 in carriage bolt through the side rail, 3-1/2 in from the back edge. Folded, it lies flat inside the frame. Swung down, it holds the back edge of the board about 12 in off the ground.
How are the parts of a cornhole board joined?
Each cornhole board uses glue, twelve #8 x 3 in screws for the frame, fourteen #6 x 1-1/4 in screws for the deck and two 1/4 in carriage bolts for the legs. A set of two boards uses twice as many.
Is a cornhole board a good first woodworking project?
Yes. It has a plywood deck, a square 2x4 frame and straight cuts, and the only curved cuts are the 6 in hole and the rounded leg ends. Every hole position is shown with its distance from the edges in inches and millimeters.
Get the next plan
We let you know when a new plan is published.
More plans
Modern C-Table
Slides over your sofa. Holds coffee, laptop and snacks. One plywood panel, one afternoon.
View plan2x4 Garage Shelving
Freestanding 8 ft shelving from studs and plywood.
Vote on FacebookMiter Saw Station
Flat, fence-level wings and storage below.
Vote on Facebook